Introduction
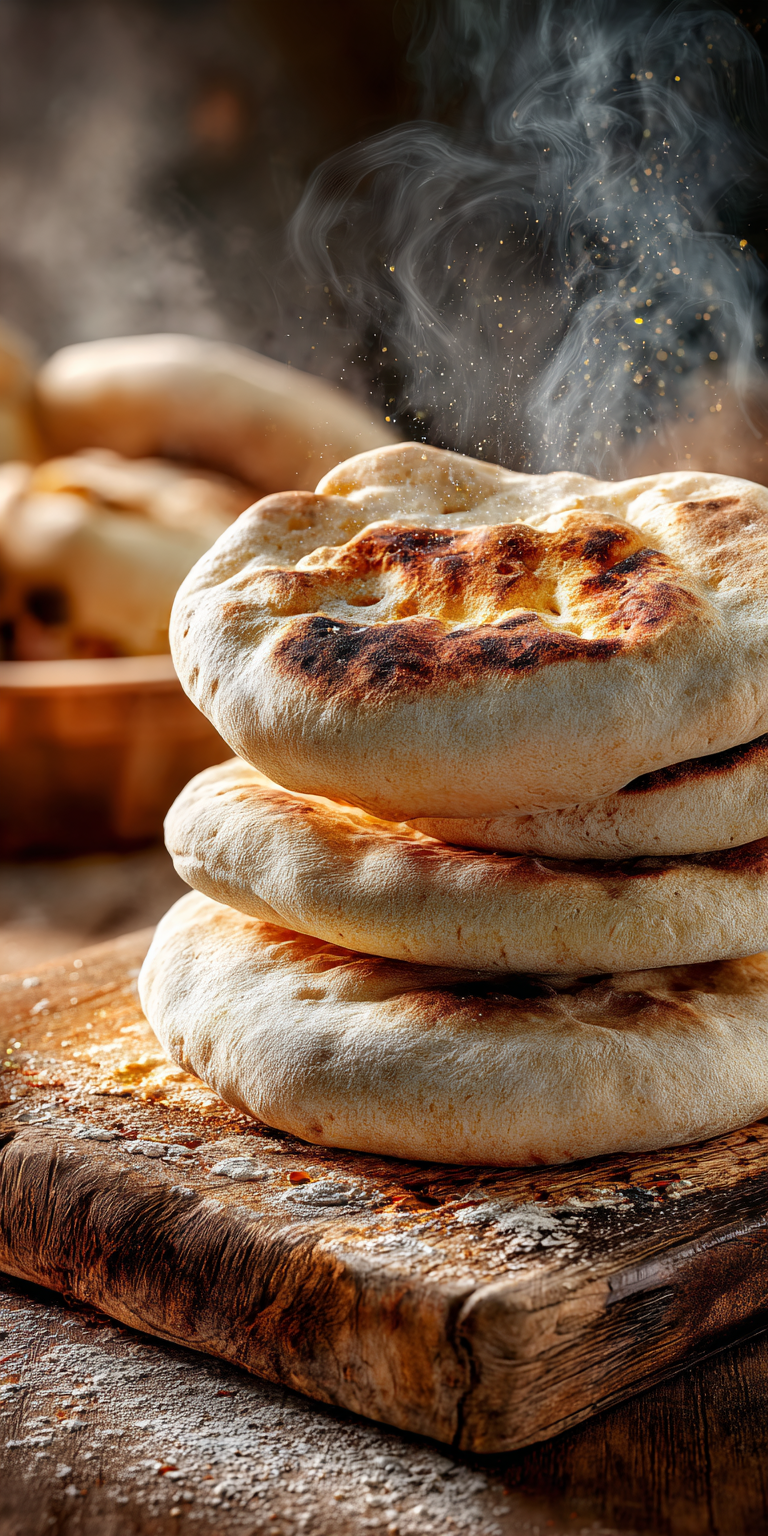
There’s something incredibly satisfying about baking your own bread, and this Pita Bread Recipe is a fantastic place to start. Pita bread, with its soft texture and versatile nature, is a staple in many cuisines around the world, especially in Mediterranean and Middle Eastern dishes. Whether you’re using it to scoop up hummus, stuff it with falafel, or simply enjoy it warm from the oven, homemade pita bread elevates any meal with its fresh, authentic flavor.

Making pita bread at home might sound intimidating, but it’s surprisingly simple and requires just a few basic ingredients you likely already have in your pantry. The process of kneading the dough and watching it puff up in the oven is not only rewarding but also a great way to connect with traditional baking methods. Plus, you can customize it to your liking by adding herbs or spices to the dough for an extra flavor kick.
In this guide, I’ll walk you through every step to ensure your pita bread turns out perfectly fluffy and delicious. From mixing the dough to achieving that signature pocket, you’ll be amazed at how easy it is to create this beloved flatbread at home. Let’s dive into the world of homemade bread with this easy-to-follow recipe!
Recipe Overview
Cuisine: Mediterranean/Middle Eastern
Category: Bread
Prep Time: 15 minutes
Cook Time: 10 minutes
Total Time: 1 hour 25 minutes (including rising time)
Servings: 8 pita rounds
Pita Bread Recipe Recipe

INGREDIENTS
PREPARATION
Notes
Enjoy your homemade Pita Bread Recipe Recipe!
Nutrition Information
What You’ll Need
To make this Pita Bread Recipe, you’ll need just a handful of everyday ingredients, each playing a crucial role in creating the perfect texture and flavor. The flour forms the base, providing structure, while yeast helps the dough rise and creates those airy pockets. Water and salt balance the hydration and enhance the taste, and a touch of sugar feeds the yeast for better fermentation. Olive oil adds a subtle richness and keeps the bread soft. Together, these components work in harmony to produce a tender, chewy pita that’s ideal for dipping or stuffing.
INGREDIENTS
- – 3 cups all-purpose flour (or bread flour for a chewier texture)
- – 1 ½ teaspoons active dry yeast
- – 1 ¼ cups warm water (about 110°F/45°C)
- – 1 teaspoon sugar
- – 1 teaspoon salt
- – 1 tablespoon olive oil (plus extra for greasing)
PREPARATION
- In a large mixing bowl, combine the warm water and sugar. Stir until the sugar dissolves, then sprinkle the yeast over the top. Let it sit for about 5 minutes until the mixture becomes frothy, indicating the yeast is active.
- Add the flour, salt, and olive oil to the yeast mixture. Stir with a wooden spoon until a shaggy dough forms, then turn it out onto a lightly floured surface.
- Knead the dough for about 8-10 minutes until it becomes smooth and elastic. If the dough feels too sticky, add a little more flour, but avoid overdoing it.
- Place the dough in a lightly greased bowl, cover it with a damp cloth, and let it rise in a warm place for about 1 hour or until it has doubled in size.
- Preheat your oven to 475°F (245°C) and place a baking stone or heavy baking sheet inside to heat up for at least 20 minutes. If you don’t have a stone, a cast-iron skillet works too.
- Once the dough has risen, punch it down gently to release air bubbles. Divide it into 8 equal pieces and shape each piece into a ball. Cover the balls with a cloth and let them rest for 10 minutes.
- On a lightly floured surface, roll each ball into a flat circle about 6-7 inches in diameter and ¼ inch thick. Keep the rolled dough covered to prevent drying out.
- Carefully transfer 2-3 pitas at a time onto the hot baking surface in the oven. Bake for 2-3 minutes until they puff up and develop golden spots. Flip if needed for even browning.
- Remove the pitas from the oven and wrap them in a clean kitchen towel to keep them soft. Repeat with the remaining dough. Serve warm or store for later use.
NUTRITION INFORMATION
- – Calories: 165 per pita
- – Carbohydrates: 31g
- – Protein: 5g
- – Fat: 2g
- – Sodium: 290mg
- – Fiber: 1g
Note: Nutritional values are approximate and may vary based on specific ingredients used.
Why Does Pita Bread Puff Up?
The puffing of pita bread is a result of steam forming inside the dough during baking. When the dough hits the hot surface of the oven, the moisture inside turns to steam, creating pressure that separates the layers of dough into a pocket. This is why it’s crucial to roll the dough evenly and bake at a high temperature to trap that steam effectively.
Can I Make Pita Bread Without a Baking Stone?
Absolutely! While a baking stone helps achieve an even, intense heat for optimal puffing, you can use a heavy baking sheet or a cast-iron skillet as alternatives. Just make sure to preheat them in the oven for at least 20 minutes to mimic the effect of a stone.
How to Store Homemade Pita Bread
To keep your pita bread fresh, store it in an airtight container or resealable bag at room temperature for up to 2 days. For longer storage, freeze the pitas by wrapping each one in plastic wrap and placing them in a freezer bag. They’ll stay good for up to 1 month and can be reheated in the oven or toaster.
Tips for Achieving the Perfect Pocket
Getting that iconic pocket in your pita bread requires a few key steps. First, ensure your oven is preheated to a very high temperature, as the quick heat is essential for steam formation. Second, avoid over-rolling the dough—too thin, and it won’t puff; too thick, and it won’t cook evenly. Finally, don’t skip the resting period after dividing the dough, as it helps relax the gluten for better shaping.
Variations to Spice Up Your Pita Bread
While classic pita bread is delicious on its own, you can experiment with flavors by adding ingredients to the dough. Try mixing in dried herbs like oregano or thyme, or sprinkle za’atar on top before baking for a Middle Eastern twist. You can also brush the pitas with garlic-infused olive oil after baking for an extra burst of flavor.
Serving Suggestions for Pita Bread
Pita bread is incredibly versatile and pairs well with a variety of dishes. Use it as a base for homemade gyros, cut it into wedges for dipping into creamy hummus, or stuff it with grilled veggies and tahini for a quick meal. It’s also fantastic alongside soups or salads to soak up every last bit of flavor.
FREQUENTLY ASKED QUESTIONS
Can I Make Pita Bread on the Stovetop?
Yes, you can cook pita bread on the stovetop if you don’t want to use the oven. Heat a cast-iron skillet or non-stick pan over medium-high heat (no oil needed). Place the rolled dough in the hot pan and cook for about 1-2 minutes on each side until it puffs up and develops golden spots. Wrap in a towel to keep soft after cooking.
Why Didn’t My Pita Bread Puff Up?
If your pita bread didn’t form a pocket, a few things could be at play. First, check that your oven or cooking surface was hot enough—insufficient heat prevents steam from forming. Second, ensure the dough wasn’t rolled too thin or pierced, as this can release steam. Lastly, old or inactive yeast might not provide enough rise, so test your yeast in warm water before starting.
Can I Use Whole Wheat Flour for Pita Bread?
Definitely! You can substitute up to half of the all-purpose flour with whole wheat flour for a nuttier flavor and added nutrition. Keep in mind that whole wheat flour absorbs more water, so you may need to add an extra 1-2 tablespoons of water to the dough to maintain a soft texture. The result will be slightly denser but still delicious.
How Do I Reheat Pita Bread?
To reheat pita bread, wrap it in a damp paper towel and microwave for 10-15 seconds to restore softness. Alternatively, warm it in a 350°F (175°C) oven for 2-3 minutes, or lightly toast it on a skillet for a crispier texture. Avoid overheating, as it can dry out quickly.

Conclusion
Mastering this Pita Bread Recipe opens up a world of culinary possibilities right in your own kitchen. The joy of pulling a batch of warm, fluffy pitas from the oven and tearing into their soft centers is unmatched, and the process is far easier than you might expect. Whether you’re pairing them with your favorite dips or using them as the base for a hearty sandwich, homemade pita bread brings a touch of tradition and freshness to every bite.
If you’re ready to elevate your bread-making game, give this recipe a try and share your results with me! I’d love to hear how it turned out or any creative twists you added to the dough. For more baking inspiration, be sure to explore other recipes on the blog, and don’t hesitate to reach out with any questions. Happy baking!